Find Entries
This activity finds Laserfiche entries and makes them available to other activities in your workflow definition. More information. See the tokens this activity produces.
Note: After this activity runs, the Messages Tab of the workflow instance details will list how many entries the activity found.
![]() How does this activity look in the Designer Pane?
How does this activity look in the Designer Pane?
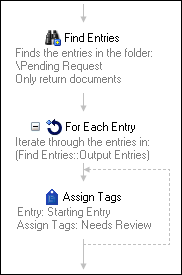
Note: Most Workflow activities can only interact with one Laserfiche entry at a time. Since the Find Entries activity finds and returns multiple entries, you will usually use this activity in conjunction with the For Each Entry activity. ![]() Show me an example.
Show me an example.
To add this activity to a workflow definition
- Drag it from the Toolbox Pane and drop it in the Designer Pane.
To configure this activity
Select the activity in the Designer Pane to configure the following property boxes in the Properties Pane.
-
 Activity Name
Once added to a workflow definition, the default name of an activity can be changed. Providing a custom name for an activity helps you remember the role it plays.
To name an activity
- Add an activity to your workflow by dragging it from the Toolbox Pane and dropping it in the Designer Pane.
- Select the activity in the Designer Pane.
- Under
 Activity Name in the Properties Pane,
replace the default name.
Note: Activity names cannot be the same as any other activity name in the workflow, they cannot be the same as the workflow's name, they must be less than 100 characters, they must contain at least one alphanumeric character, they cannot be "Name," and they cannot be the same as the activity's runtime type (which is usually only an issue with custom activities).
-
 Activity Description
Use the Activity Description to provide descriptive text to help you remember the role that the activity plays in the workflow. All activities contain a default description that you can modify while constructing your workflow.
To modify an activity description
- Add an activity to your workflow by dragging it from the Toolbox Pane and dropping it in the Designer Pane.
- Select the activity in the Designer Pane.
- Under
 Activity Description in the Properties Pane, replace the default description.
-
 Entries to Find
The
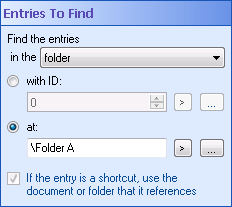
 Entries To Find property box determines where the Find Entries activity looks for entries.
Note: If you want to return only an individual document, rather than the parent folder, use the Find Entry activity instead.
To configure Entries To Find
- Add the Find Entries activity to your workflow definition by dragging it from the Toolbox Pane and dropping it in the Designer Pane.
- Select the activity in the Designer Pane.
- Use the drop-down menu to either find entries in a specified folder or find entries in the same folder as a specified entry.
- Under Entries To Find in the Properties Pane, determine how you want to find entries.
To find entries based on their ID number
All documents, folders, and shortcuts stored in a Laserfiche repository are assigned a Laserfiche Entry ID number. If you choose to find entries based on an ID number, the entry with the specified ID does not need to stay at the same path for the Find Entries activity to find it.
- Select with ID.
- Type an entry ID, or click the Browse button (ellipsis)
 to open the Browse Laserfiche Entries dialog box. Alternatively, click the Token button (right arrow)
  to use tokens.
Note: If the ID refers to a document or shortcut (instead of a folder), the activity will return all the entries in same folder as the document or shortcut.
To find entries based on their location in a repository
If you choose this option, the entry you specify a location for must stay at the same path for the activity to run correctly.
- Select at.
- Type a location path, or click the Browse button (ellipsis)
 to open the Browse Laserfiche Entries dialog box. Alternatively, click the Token button (right arrow)
  to use tokens. You can only enter a destination within the Laserfiche repository selected in the Connection Profile.
Note: If you browse to or specify a path to a document or shortcut (instead of a folder), the activity will return all the entries in same folder as the document or shortcut.
- Optional: If you select to find the entries in the same folder as the entry and the entry is a shortcut, you have an additional option.
- Select If the entry is a shortcut, use the document or folder that it references to retrieve entries in the folder where the actual entry is located. If you don't select this option, the activity will return the documents in the folder where the shortcut is.
 Give me an example.
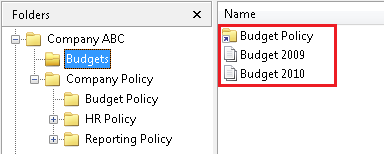
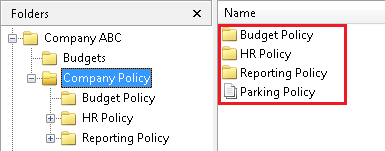
Example: The Financial Statements folder, inside the Accounting folder, contains several statements. If you select to find the entries in the folder Financial Statements (specified by either its ID or path), then all of the statements inside that folder will be returned.
 Show me what that looks like. If you select to find the entries in the same folder as the entry Financial Statements (specified by either its ID or path), then all the entries inside the Accounting folder will be returned.
  Show me what this looks like.
 -
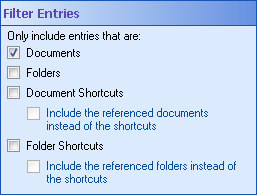
 Filter Entries
Once entries are found by the Find Entries activity, this property box determines which related entries will also be returned.
To configure Filter Entries
- Add the Find Entries activity to your workflow definition by dragging it from the Toolbox Pane and dropping it in the Designer Pane.
- Select the activity in the Designer Pane.
- Under
 Filter Entries in the Properties Pane, choose one or more of the following.
- Documents: Includes documents in the entries returned.
- Folders: Includes folders in the entries returned.
- Document Shortcuts: Includes document shortcuts in the entries returned.
- Include the referenced documents instead of the shortcuts: Returns the actual documents instead of their shortcuts.
- Folder Shortcuts: Includes folder shortcuts in the entries returned.
- Include the referenced folders instead of the shortcuts: Returns the actual folders instead of their shortcuts.
Example: If the "Finances" folder contains a shortcut to the document "Budget Proposal 2010", selecting Include the referenced documents instead of the shortcuts will return the "Budget Proposal 2010" document instead of a shortcut to the document.
-
 Additional Properties
Use the Additional Properties property box to retrieve additional properties about the entry.
Warning: You can retrieve only one event date from a record. If the record has multiple event dates, the events will be ordered according to their assigned dates, and Workflow will retrieve the first date in that order. The ordering happens with blank event dates being first, followed by non-empty event dates going from later dates to earlier dates. For example, if there are multiple events and any of the events has a blank date, Workflow will retrieve a blank date. If there are multiple events and they all have non-empty dates, Workflow will retrieve the latest date among them.
To retrieve additional properties
- Click the Additional Properties property box to load the Select Additional Properties dialog box.
- Select the check box next to each desired property. Selected properties are available to subsequent Workflow activities as tokens.
-
 Fields
Use the Fields property box to retrieve field data from the found entries .Configure the Fields to retrieve
-
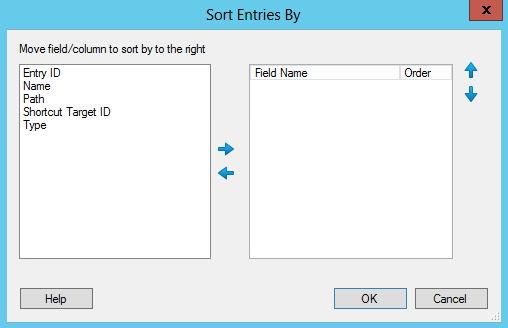
 Sort Found Entries By
- Use the Sort Found Entries By property box to configure the order the found entries will return in.
- By default you can sort by Entry ID, Name, Path, Shortcut Target ID, Type. You can sort by any Additional Properties or Fields you retrieve.
- To add a sorting category click on the property and add it to the right side of the dialog.
- You can add additional categories to create more specific sorting rules. You can adjust the priority of the categories by pressing the up and down arrows to the right of the box.
- You can toggle between sorting Ascending/Descending by clicking on them in the Order column
Note: If you have more than one connection profile for your workflow definition, the Connection Profile property box lets you specify which connection profile this activity will use.

